Double Peanut Butter M&M’s Cookies

Double Peanut Butter M&M's Cookies I Pretty Little Pastimes
Every so often, a cookie recipe comes along that you just know is going to be a keeper and I was right with this peanut butter cookie. The problem with recipes I have attempted in the past, is that they are too hard or lack sweetness. This cookie stays soft and has just the right amount of sweetness for me. Although you can make them with Milk Chocolate M&M’s, I always make them using Peanut M&M’s or, my favorite, Peanut Butter M&M’s. With the Peanut Butter M&M’s you get a double peanut butter cookie that is hard to resist!

I made these over my Easter weekend with pastel colored Peanut Butter M&M’s eggs for a little holiday flare.

Double Peanut Butter M&M’s Cookies

  • 1/2 cup salted butter, softened
  • 1/2 cup light brown sugar
  • 1/4 cup sugar
  • 1 large egg
  • 3/4 cup creamy peanut butter
  • 1 teaspoon pure vanilla extract
  • 1/2 teaspoon baking soda
  • 1 & 1/4 cups all purpose flour
  • 1 & 1/2 cups peanut butter M&M’s

In a large mixing bowl cream the butter and sugars on medium speed. Mix in the peanut butter, egg and vanilla, one at a time, until combined. Slowly mix in the baking soda and flour; be careful not to overmix. Gently fold the M&M’s into the dough. Place the finished cookie dough in the refrigerator to chill for 30 minutes.

Preheat oven to 350 degrees. Drop the dough by the tablespoonful onto an ungreased cookie sheet (I always cover my cookie sheet with parchment paper for easy cleanup). Press the dough slightly since they do not spread much while baking. Bake for 8-9 minutes until just the edges are beginning to turn golden but the cookies is still soft. Remove from oven and allow to cool/harden on a wire rack.

I will definitely be adding these to my Christmas Cookie baking list. With red and green M&M’s, they will make a great care package for my mom who can resist all sweets except a good peanut butter cookie! Like mother, like daughter. Enjoy!

Lucky Charms Rainbow Cupcakes

Lucky Charms Rainbow Cupcakes! I Pretty Little Pastimes

This St. Patrick’s Day I wanted to make one of my favorite themed cupcakes – Rainbow Cupcakes! I have made them a few times now, sometimes with green sprinkles on top, a white cloud of frosting, or even a shamrock, but this year I wanted to try them with some Lucky Charms brand cereal to make it a little more playful. I knew I also wanted to keep the “pot of gold at the end of the rainbow” theme, so I searched for some gold wrapped chocolate coins. They were not the easiest to track down, but I found a great little candy shop in our local mall that sold them by the pound. I just might have “accidentally” purchased a little more than I needed (whoops). They may look like I spent hours in the kitchen baking, but they are actually very simple to make and only a couple of extra steps then making a traditional cupcake. Whether you make them for friends, family, or just because, this Pretty Little Pastime is sure to get everyone in the St. Patrick’s Day spirit!

White Cake

  • 2 1/2 cups cake flour sifted
  • 1 1/2 cups white sugar
  • 3 teaspoons baking powder
  • 1 teaspoon salt
  • 1/2 cup unsalted butter
  • 1 cup milk
  • 1 1/2 teaspoons vanilla extract
  • 1/4 teaspoon almond extract
  • 3 egg whites (at room temperature)
  • food coloring (primary colors: red, blue, yellow, green)

Decorations

  • 15 cupcake liners
  • 2 cups Lucky Charms brand cereal
  • gold wrapped chocolate coins (optional)

Start by preheating your oven to 350 degrees. Line two 12-muffin tins with cupcake liners. In a large mixing bowl, sift together the flour, sugar, baking powder and salt. Add butter, 3/4 cup of milk, vanilla, and almond extract and beat on low until blended. Increase speed to high and beat for another two minutes. With a spatula, scrape the sides of the bowl and add the remaining 1/4 cup milk and egg whites. Beat for 30 seconds on high.

rainbow cupcake batter 2

Rainbow Cupcakes I Pretty Little Pastimes

Separate the batter equally into 5 small bowls. Add the food coloring one drop at a time to make up the colors: red, orange, yellow, green and blue. You can also add purple, but I skip it so the cupcakes do not get too dark on top. Once you have the colors at your desired hue (remember they do darken slightly while baking), spoon each color one at a time into the liners. Try to pour the batter into the middle of the liner in a steady stream, so it spreads evenly. Continue with each color until all of your tins are  1/2 to 3/4 full. Place the muffin tins on the center rack and bake for 15-20 minutes or until a toothpick inserted into the center comes out clean.

Remove the cupcakes and let cool completely.

Rainbow Cupcakes I Pretty Little Pastimes

Vanilla Frosting

  • 3 sticks + 2 tablespoons unsalted butter, softened and cubed
  • 3 cups sifted confectioners sugar
  • 3 tablespoons milk
  • 1 1/2 teaspoons pure vanilla extract
  • pinch of salt

To start your frosting, whip the butter on medium speed for 8 minutes. Once the butter is creamy, add the sugar, milk, vanilla, and salt and mix on low for 1 minute. Turn up the speed to medium and continue to mix for another 6 minutes. Add green food coloring to the frosting to get a pale green color. Top the cooled cupcakes with your frosting in an even layer. Immediately top with a sprinkle of Lucky Charms brand cereal and repeat until all cupcakes are complete.

I love making these cupcakes and giving them to people as a little St. Patrick’s Day treat! They are always surprised when they bite in and see all of the rainbow colors. The cake and frosting recipes are also good to keep on hand for a quick cupcake anytime. Enjoy!

Adding Inspirational Quotes to your Photos

Add quotes to your favorite photos.

The Grand Canyon … words, photos, even film, in no way capture the magnitude and beauty of this natural wonder. I visited the Canyon for the first time last summer. Walking up to it, I was at a complete loss for words. I just stopped, stared, and for that moment it was the only thing that existed. It is hard to explain the feeling you get when a vision of nature’s beauty suddenly makes you feel so tiny. It’s the feeling you get when you stare into a calm ocean from an empty beach or hike a winding path in a quiet forest. Truly remarkable.  Continue reading

Beer Battered Fish Tacos with Tomatillo Salsa

Beer Battered Fish Tacos with Tomatillo Salsa I Pretty Little Pastiimes

As a Southern California native, I have a huge appetite for authentic homemade Mexican food. Since moving across the country a few years ago, this has become one of the things I miss the most about the Golden Coast. Whenever I do visit, one thing I make sure to indulge in are San Felipe style fish tacos!

I wanted to share my recipe for Beer Battered Fish Tacos with Tomatillo Salsa. These tacos definitely help curb my craving until my next trip.  Continue reading

Winter Care Tips for Dogs

blizzardbogey2sm

If your pups are anything like mine, then they adore that curious white powder that falls from the sky during the Winter. This being the first snow-filled Winter for my two dogs, I have done a little research to make sure they are safe from the unpredictable weather conditions. I wanted to share with you some Winter Care tips for your pups.

Don’t leave them in the cold for long periods of time. Bogart and Maggie May play and chase each other until they are soaked, out of breath and ready for dinner! If I let them, I am sure they would stay outside until they were frozen solid. That is why it is important to make certain that when the temperature falls and the wind chill is high, that you don’t leave your dogs outside in the cold for long periods of time. Check on them often and make sure your little ones haven’t stepped a little too far into the deep snow.

blizzardcoveredbogeysm

Make changes to their grooming for the season. Grooming can be especially important during the Winter months. Maggie & Bogey are very different in their needs for grooming when there is snow on the ground. Maggie has very short fur on her paws which does not collect snow. Bogey on the other hand, has long hair around his front and back paws and when he comes in from a good play session, he looks like he is wearing boots! Snowballs of all sizes stick to his little paws and belly. As soon as he comes in, I make sure to wipe him down with a towel (gently, so it does not tug at his fur) and check his paws for ice. I then turn the kitchen faucet on lukewarm and put him in the sink to melt the snow slowly. You don’t want to use hot water to do this, since their cold bodies will be extra sensitive.

blizzardpawssm

Keep them hydrated and nourished. Even if they like to eat a little snow when they are outside, snow does not replace the need for fresh water. They may be soaked when they walk in, but make sure to offer them some good ol’ H20. During the Winter, your dogs are also burning more calories keeping their bodies warm, so make sure to adjust their diet/serving sizes accordingly. This is one tip Bogey does not have problem with!

Carefully store ice-melting solutions. Anti-freeze, salts and other materials may not seem tasty to us, but for our curious four-legged friends, they might be worth a lick or two. Make sure to store these and any other hazardous materials out of your dog’s reach. Remember to check their paws regularly for salt and remove it immediately to avoid irritating/harming their pads.

Pack an Emergency Pet Pack. When preparing for Winter storms and possible power outages, don’t forget to pack a Pet Pack. Keep an extra bag of food, treats and warm bedding ready for your pups. Double check that you have copies of important pet paperwork and prescriptions handy as well, so you can grab it quickly if you need to leave the house in a rush.

Help them find their way home. Remember that rough Winter conditions can make it easier for dogs to lose their scent. Keep them on leashes when taking walks and make sure their identification tags are always secure and up-to-date.

And lastly, HAVE FUN with your dogs outside! We had a huge snow fall, this last weekend and I took some time out to play with them in the fresh powder and snapped some pictures. They loved digging tunnels and running after flying snowballs. I can’t wait to turn some of these pictures into a Pretty Little Pastime!

Happy Birthday Pupcakes

ImageOne of our two little pups, Bogart, celebrated his first birthday this past weekend. We adopted him as a puppy from a local animal rescue when he was only 12 weeks old. He was my first puppy (our second pup we adopted as an adult), so it has been such a fun experience watching him grow and learn over the last year. I decided to make him a special treat for his big day. These “Pupcakes” are a Pretty Little Pastime, your four-legged best friend will definitely approve of!

What you will need:

Ingredients:

  • 1 egg
  • 1/4 cup peanut butter
  • 1/4 cup vegetable oil
  • 1 teaspoon vanilla (alcohol-free)
  • 1/3 cup honey
  • 1 cup shredded carrots
  • 1 cup whole wheat flour (preferred) or white flour
  • 1 teaspoon baking soda

I reserved extra peanut butter and shredded carrots to top my pupcakes. I also used Milk Bone brand treats and Beggin’ Strips to finish decorating.

Preheat your oven to 350 degrees. In a mixing bowl, combine the egg, peanut butter, oil, vanilla, and honey. Blend well. Stir in the carrots and mix thoroughly. Sift flour and baking soda together and fold into batter.

Fill 6 lined cupcake molds 3/4 of the way full with the batter. Bake for 20 minutes (35-40 minutes if making one full cake) or until cooked through. Remove from the oven and let the pupcakes cool completely before frosting.

Once cooled, spread peanut butter over the tops of the pupcakes and top with remaining carrot shred “sprinkles”. Break a Beggin’ Strip in half and push one side firmly into the cake to keep in place. Add a Milk Bone treat in front of the strip and your pupcakes are ready to be served!

Image

Bogey loved his birthday pupcake and just like most kiddos he took the time to lick off all the frosting first! I made sure to remove the wrapper before he started on the cake also. This recipe only makes 6 pupcakes, which is great for a little birthday treat, and can easily be doubled or tripled if you are having a bunch of party animals over. It is sure to get all of their tails wagging!

Check back for more on our Doggy Birthday celebration.

Conversation Heart Mini-Cheesecakes

Mini Conversation Heart Cheesecakes I Pretty Little PastimesWith Valentine’s Day just around the corner I have been busily looking for a sweet gift for my Valentine. If you are like me, it takes some time to think of the perfect “man-friendly” (but still sentimental) gift for this day. I have baked cakes and cupcakes in the past, but wanted to try something different this year. When I saw a recipe for mini cheesecakes I knew I had a winner! I had never attempted to make a homemade cheesecake, so I made it my Valentine’s Day Pretty Little Pastime.

What you will need:

Ingredients:

  • 1 cup graham cracker crumbs (I used Keebler brand)
  • pinch of cinnamon
  • 1/4 cup butter (melted)
  • 16 oz. cream cheese (softened)
  • 1 cup sugar
  • 3 large eggs
  • 2 cups sour cream
  • 1 teaspoon vanilla extract
  • food coloring (primary colors)

Kitchen Supplies:

  • standmixer or handheld mixer
  • two heart shaped silicone molds (I used Wilton brand)
  • rubber spatula
  • decorating icing (I used Wilton brand with a thin tip attachment)
  • roasting pan with wire rack

Place the wire rack into your roasting pan with empty heart silicone molds on top. Fill the pan with enough water to go 3/4 of the way up the sides of the molds. This will act as your water bath during baking. Remove the wire rack and heart molds and place the water-filled roasting pan in the oven. Preheat your oven to 325 degrees with the pan inside.

To make the crusts of your mini cheesecakes combine the graham cracker crumbs, melted butter, and cinnamon. Mix together until well combined. Fill each heart cavity with about a tablespoon of the graham cracker mixture. Press down on the crumbs firmly to make an event crust. Place the molds into the refrigerator until you are ready to fill them with the cheesecake mixture.

Beat the softened cream cheese on medium-high speed until smooth. You will want to make sure to scrape down the sides of the bowl and mixing blades to avoid lumps. Once smooth, add sugar and beat for one minute. Add eggs and beat for 1-2 minutes until creamy. Add the sour cream and vanilla and mix to combine.

Equally divide the cheesecake filling into six bowls (clear works best so you can see the colors well). Add your food coloring until you get the desired color. Remember that the colors will darken slightly as they set. I decided on pastel green, pink, yellow, orange, blue, and purple. When you cheesecake fillings are finished pour them into the heart shaped molds. Fill the molds to the very top with each color. You should have two cakes in each color.

cakescollagesm

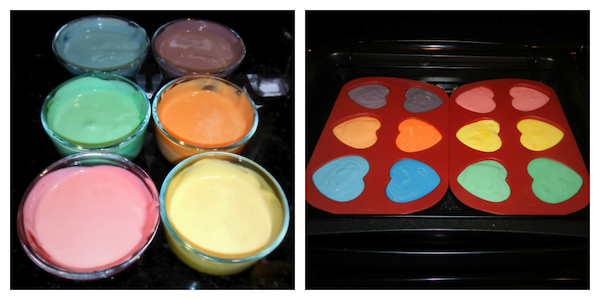
Carefully place the silicone molds onto the wire rack and lower into the roasting pan. The water should rise to at least 1/2 of the side of the molds – if it does not, add boiling water to the pan. Bake for 25-30 minutes. You will know when they are finished with you tap the mold and they jiggle together as a solid piece.

When the cakes are finished baking, carefully remove them from the oven and let cool at room temperature for one hour. Before attempting to remove the cakes from the molds, set them in the freezer for at least 2 1/2 hours. Once frozen, you will be able to pop them out of the molds easily.

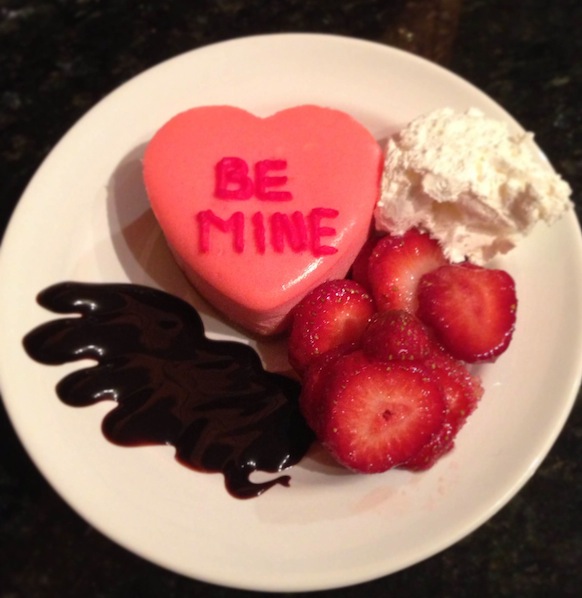
Once all of the cakes are out of the molds, take your decorating icing and pipe conversation heart sayings on each cake. Do not worry about making sure each is perfecting aligned – many conversation hearts are printed off center. I wrote sayings like: “xoxo”, “be mine”, “melt my heart” “cutie pie”, “true love”, and “hug me”. I also reserved one special cheesecake with our initials on it.

Once the cakes are brought to room temperature they are ready to be served!

If you are planning on making these ahead of time, they can be placed back into the refrigerator for a couple of days or the freezer for up to a month. If you want to freeze them, I would wait to decorate them, as the icing will change color when frozen and bleed into the cakes slightly.

This simple cheesecake recipe is a keeper. Tonight I paired one of my mini cheesecakes with fresh strawberries and a chocolate drizzle. I can’t wait to try it with a raspberry coulis or blueberry compote next! These are going to make the perfect gift for my Sweet Valentine.

cheesecake2

Happy Valentine’s Day! xoxo

recipe source: Tyler Florence’s Ultimate Cheesecake

Italian Arancini (Rice Balls)

Image

It is startling how much money I used to just throw away by letting meats, cheeses, breads, and produce go bad in my refrigerator. I would have such good intentions for cooking at home, but somehow I would routinely end up with a $100 dollar grocery bill and nothing to show for it but a packed trash bag. I have challenged myself to not only throw away less food this year by being more creative with my shopping and menu planning, but to also minimize the occasional tupperware “science project” that used to show up in the back of my fridge a little too often.

I started out this week’s menu with shrimp & andouille creole over white long-grain rice. Our eyes were bigger than our stomachs that night, so we had quite a bit of rice left over. The next day I started thinking about how I could use up the rest of the rice. In no time I had my heart set on recreating the Arancini that I used to order from one of my favorite bistros. I just knew the rice, which we had seasoned with garlic, onion, salt, and pepper would work perfectly!

Arancini is a traditional Italian rice ball dish. I have seen it used as a main course and also as a starter or side dish. I just love the crispy texture of the seasoned breadcrumbs paired with the gooey cheese on the inside. Served warm on the table with a side of marinara for dipping, I knew arancini would be a tasty side for our tortellini.  Continue reading

Texas Sheet Cake

Image

Within the last three years, I have given myself a real push to spend more time in my kitchen preparing meals of my own. It is so rewarding to put the time in to create a dish that guests (and yourself) just love. But one culinary feat that I have decided to pursue in 2013 is baking! Don’t get me wrong, I can make a mean cupcake out of a box, but I really want to learn the craft and skill of baking from scratch. I decided that I would try a very timeless and delicious first cake for my next Pretty Little Pastime, Texas Sheet Cake.  Continue reading

Long Distance Friendship Mug

Image

I have been seeing so many DIY ceramic mug projects over the last month and they seemed like the perfect weekday night Pretty Little Pastime! I moved across the country a few years ago and still have so many friends on the West Coast that I thought the Long Distance Friendship mug would make a sweet gift.

All you will need for these DIY mugs are:

  • 2 plain white ceramic mugs (I purchased mine at Target for under $3 each)
  • 1 black permanent marker
  • 1 pink permanent marker

Instructions: Print out or reference the state shape or outline you want to showcase on your mugs (one for you and one for your gift). Preheat your oven to 350 degrees. While it is heating up, begin drawing your image on the first mug. Alternate state drawing and text on different mugs so each has a chance to dry. Go over each section twice, or as many times as you would like to get the desired thickness. Once finished, place the mugs on a baking sheet standing up and bake them on the middle rack for 30 minutes. Carefully remove the mugs and let cool before handling.

This Pretty Little Pastime can be tweaked for any occasion or to personalize plain dinning wear. Can’t wait to try it on ceramic plates next!