Summertime Pupsicles

Chicken and Carrot Pupsicles I Pretty Little Pastimes

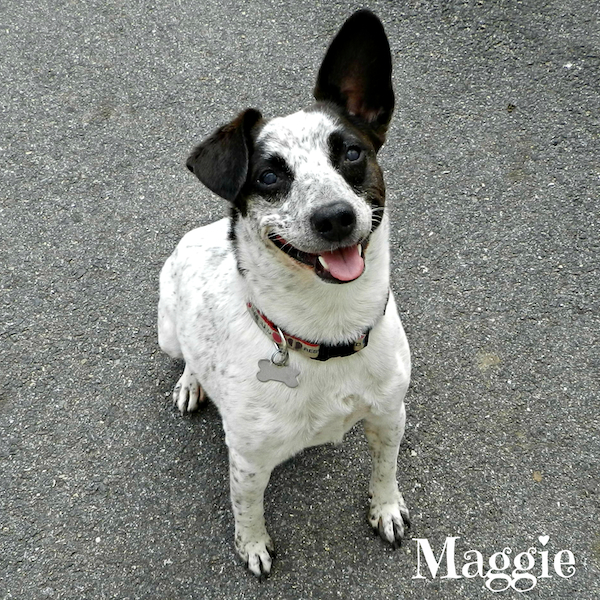
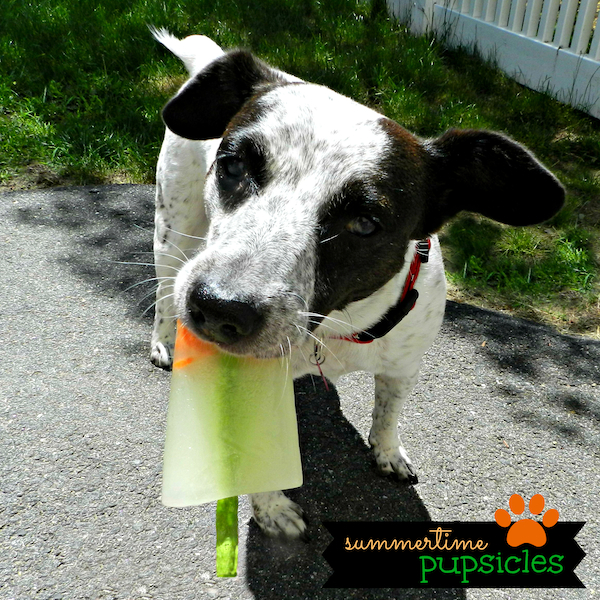
Now that the weather is officially in sun-blazing summer-mode, I am spending more and more time outside. Beach days, hikes, and long walks with the pups are topping my list so far. Since I am on a new coast this year, it has been an exciting season of firsts. And while I am trying my hand at some new dishes in the kitchen for the two-legged members of the family, I never want to leave Maggie and Bogart out. This past weekend I decided to finally use the popsicle molds that have been sitting in a drawer to freeze a cold treat for those dog days of summer.

 Chicken & Carrot Pupsicles

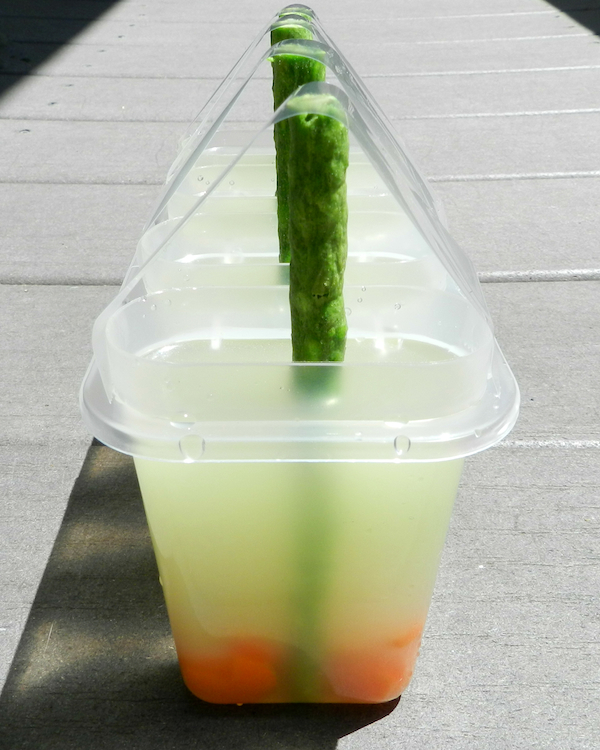
  • 3 cups chicken broth (I used low-sodium, organic)
  • 2 small carrots, sliced
  • 4 thin rawhide chews (for the pupsicle sticks)

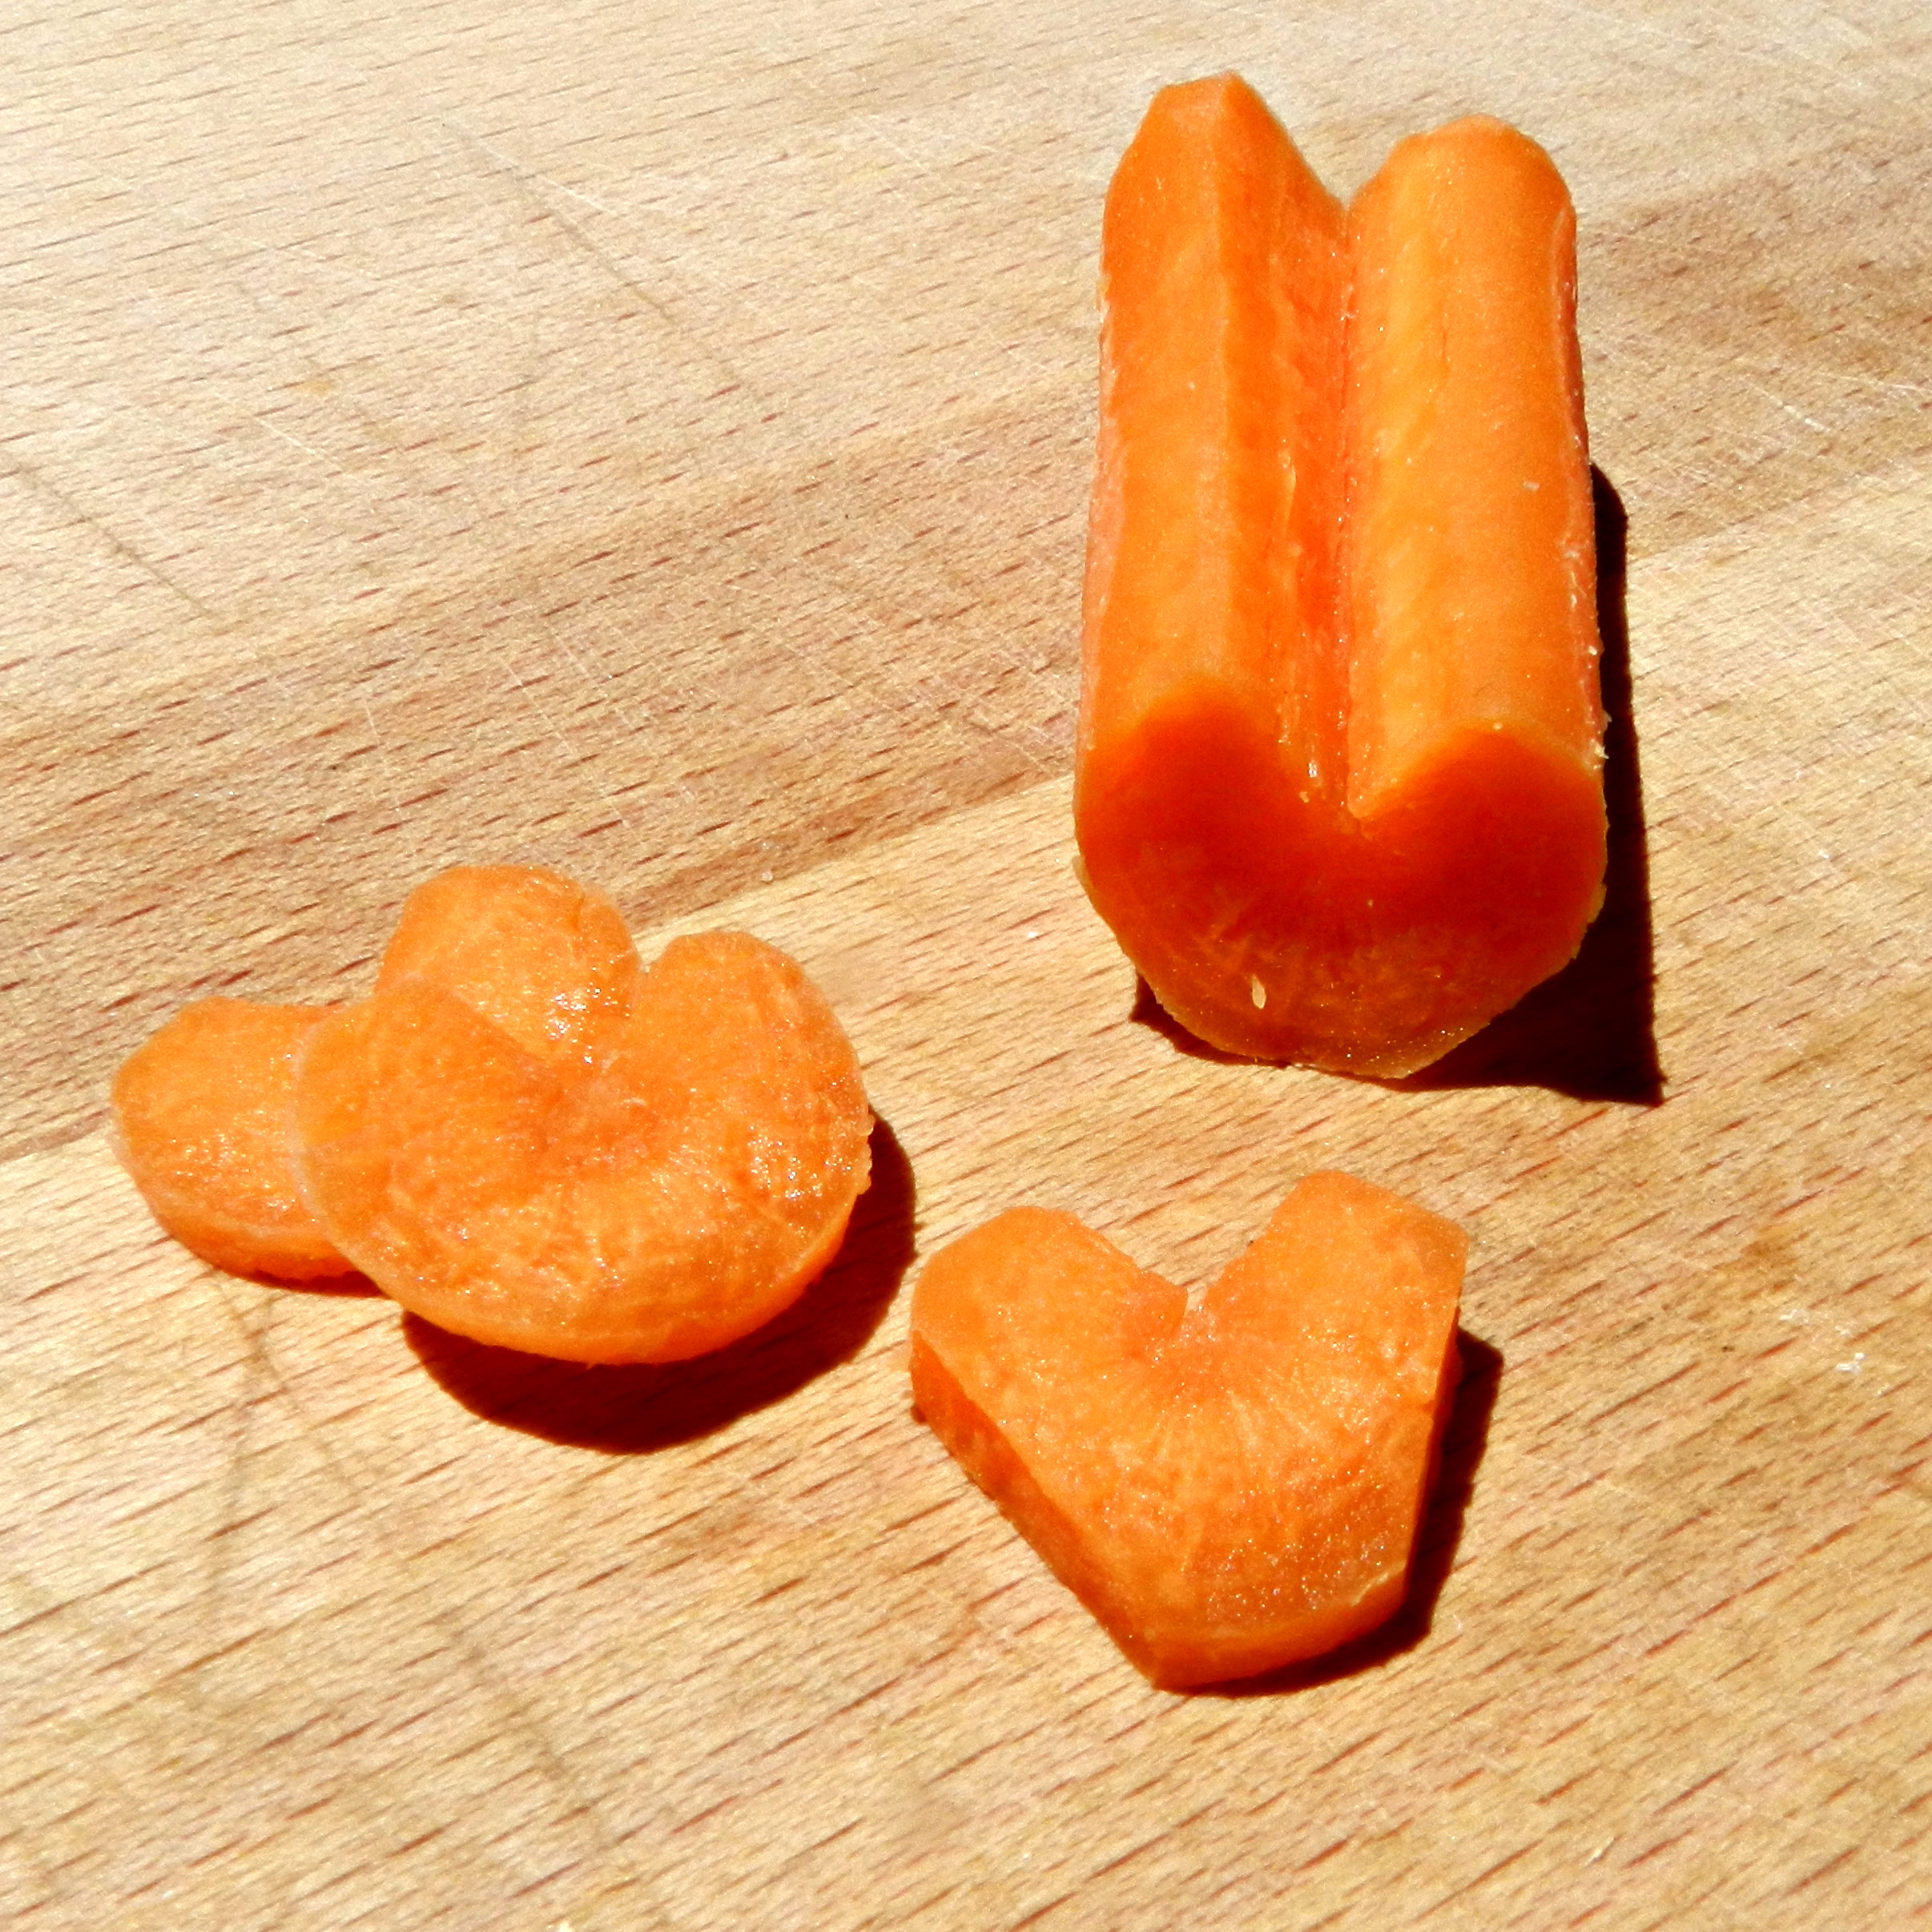
Start by pouring the chicken broth into each of the popsicle molds. Chop the carrots into thin slices. I made two small angular cuts at the top of the carrots to form the heart shape on my carrot coins. Place the carrots into the broth (they will sink to the bottom).

Chicken and Carrot Pupsicle I Pretty Little Pastimes

Next, place the rawhide chew in the middle of each mold to act as the popsicle stick. I knew they would not stay in place with out a little help, so I used 4 strips of clear tape to anchor them. Place the molds into the freezer until hardened. Once frozen, remove the tape from the molds and gently pop the pupsicles out. Tempting as it is, avoid prying them out by the stick, so it does not break. If they are being stubborn, run a little warm water over the mold until they loosen.

Chicken and Carrot Pupsicle I Pretty Little Pastimes

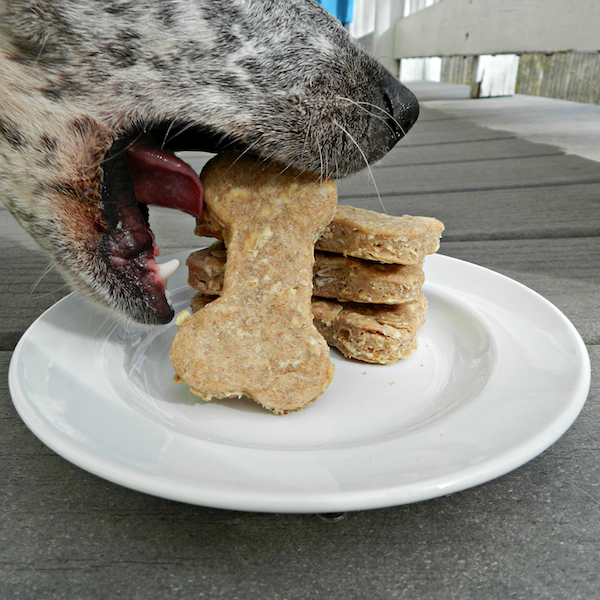
This was a tough one to snap photos of, since my dogs wanted to carry them off to the grass to eat. But I loved this shot of Maggie’s paws and one of the heart carrots that had fallen (it was gobbled up seconds later). They made them look so good, it might be time for me experiment a little with some fruity popsicles for myself! Stay cool everyone!

Chicken and Carrot Pupsicle I Pretty Little Pastimes

Advertisement

Maggie’s 3rd Birthday

Dog-friendly Birthday Cake Recipe I Pretty Little Pastimes

Less than a week into July and we have already celebrated two big occasions in our house, the Fourth of July and our pup Maggie May’s 3rd birthday! If you would have told me three years ago that I would be throwing puppy parties and baking dog-friendly cakes today, I would not have believed you. I never had pets growing up, except for the occasional short-lived goldfish, so I never really understood the close relationship you could develop with a four-legged friend. My two pups are a huge part of my family now and I could not imagine life without them! Nothing is better than coming home to those crazy wagging tails! I think it is safe to say that I have become a true dog lover, maybe even one of those “crazy dog ladies”. And I wouldn’t have it any other way!

I have posted my favorite recipe for Happy Birthday Pupcakes, but wanted to share with you the full cake version that I used for her 3rd birthday. Since I did not have a mini cake pan, I improvised and used a basic tin can (the kind you will find any vegetable in at the grocery store) to create the shape I wanted. Keep in mind, you can use this technique for mini people-friendly cakes as well. Here is the recipe:

Dog-friendly Birthday Cake

  • 1 egg
  • 1/4 cup peanut butter
  • 1/4 cup vegetable oil
  • 1 teaspoon vanilla
  • 1/3 cup honey
  • 1 cup shredded carrots
  • 1 cup whole wheat flour (preferred) or white flour
  • 1 teaspoon baking soda
  • 1 14.5 oz. can, emptied
  • additional peanut butter, sliced carrots, bone shaped dog food and Beggin’ Strip brand dog treats for decorating

Start by emptying the contents of a 14.5 oz. can. Wash, rinse and dry completely. Carefully remove the top lid as well as the lip directly under it (removing the lip helps the cake to easily pop out after baking). Coat the inside of the can liberally with non-stick spray and wrap the bottom with tin foil. Place the can on a baking sheet and set aside.

Dog-friendly Birthday Cake Recipe I Pretty Little Pastimes

Preheat your oven to 350 degrees. In a mixing bowl, combine the egg, peanut butter, oil, vanilla, and honey. Blend well. Stir in the carrots and mix thoroughly. Sift flour and baking soda together and fold into batter. Fill the prepared can a little over 3/4 of the way full with the cake batter. As the cake bakes in the oven, it will rise above the top of the can, which you can remove later before decorating. Bake for 35-40 minutes or until cooked through. Remove from the oven and let cool completely.

Once cooled, turn the can upside-down and gently shake until the cake pops out. Trim the top of the cake, if desired, to get an even surface. Adhere carrot-coin polka dots by smearing a small amount of creamy peanut butter on back of each and pressing firmly onto the cake. Use additional peanut butter to frost the top of the cake. Add a Beggin’ Strip brand dog treat, bone shaped dog food pieces and candle on top to finish of the decorations.

Dog-friendly Birthday Cake Recipe I Pretty Little PastimesMaggie loved her birthday cake! Between her and Bogey, they had it gobbled up in no time! Happy Birthday Maggie May!


Chocolate-Covered Strawberry Muffins

Chocolate Covered Strawberry Muffins I Pretty Little Pastimes

Who doesn’t love chocolate-covered strawberries? They are one of those sweet treats that just make you feel like you should be celebrating over a cold glass of champagne. Well, it was a little early in the day for some bubbly, so I decided to try and work these flavors into a more early-afternoon appropriate snack. What could be better than a warm muffin to start my day? I don’t normally eat chocolate this early in the day, but today I made an exception. And after what I tasted when I tried one straight out of the oven, it might just happen more often.

Chocolate-Covered Strawberry Muffins

  • 3 cups flour
  • 4 teaspoons baking powder
  • 1 teaspoon salt
  • 1 teaspoon cinnamon
  • 2 eggs, at room temperature
  • 3/4 cup sugar
  • 1/4 cup light brown sugar
  • 1 cup milk, at room temperature
  • 1/4 cup canola oil
  • 1 teaspoon pure vanilla extract
  • 2/3 cup dark chocolate chips (or semi-sweet)
  • 1 and 1/4 cup fresh strawberries, chopped
  • coarse sugar

Preheat oven to 425 degrees F. Spray a muffin pan with non-stick spray or line with muffin tins. In a large mixing bowl, gently combine flour, baking powder, salt and cinnamon. Set aside. In another bowl, whisk together eggs and sugars until combined. Mix in milk, oil and vanilla. Fold wet ingredients into the flour mixture until just combined, being careful not to over-mix (the batter should be thick and slightly lumpy). Carefully fold in the chocolate chips, followed by the strawberries.

Chocolate Covered Strawberry Muffins I Pretty Little Pastimes

Pour the batter into the prepared muffin pan, filling each cavity to the top. Sprinkle the tops with coarse sugar. Bake the muffins at 425 degrees F for 4 minutes. Keeping the muffins in the oven, lower the temperature to 375 degrees F and continue to bake for 14 additional minutes or until a toothpick inserted in the middle of the muffins come out clean. Remove from oven and allow to cool for 10 minutes.

Chocolate Covered Strawberry Muffins I Pretty Little Pastimes

These muffins will taste best fresh from the oven, but can be stored in an airtight container for up to 5 days. I have some extras in the kitchen and will definitely serve them warm with some vanilla frozen yogurt or fresh whipped cream for dessert later. Enjoy!

Fresh Cherry Crisp

Fresh Cherry Crisp I Pretty Little Pastimes

Fresh Cherry Crisp

This time of year means a lot of things to me, backyard barbecues, trips to the beach and fresh fruit everywhere! Sometimes I get a little overzealous at the store and end up with more fruit than I know what to do with. If I knew that I only had a couple days left before it went bad, I used to always ask aloud, “What should I do with this?” The immediate response from the BF was, “Something easy, like a crisp”. I used to cringe at this statement, because the “something easy” crisp had eluded me for years. Without fail, it would cook unevenly or I would end up with a mouthful of pure sugar when biting into it, ick. But after multiple failed attempts, I finally ended up with a winning recipe. It is quick and easy (really this time), perfect for a weeknight menu. I have made this twice in the last month, once with fresh strawberries and again with fresh cherries. But this recipe is not just for those warm summer months, with the addition of a little cinnamon and clove to your fresh fruit, it is perfect for Fall! So keep it handy!

Fresh Cherry Crisp I Pretty Little Pastimes

Fresh Fruit Crisp

  • 1 cup old fashioned oats
  • 1 cup flour
  • 1 cup brown sugar
  • 1/4 chopped walnuts
  • 1/2 cup butter
  • 1/2 cup sugar
  • 3 cups fresh fruit; chopped

Preheat oven to 350 degrees. Mix together oatmeal, flour, brown, sugar and walnuts. Cut in butter until crumbly. In a separate bowl, mix fresh fruit with white sugar. Grease an 8″ square pan and spread half of the crumb mixture in an even layer on bottom. Layer the fruit next, followed by the remaining half of the crumb mixture. Bake for 40-45 minutes or until golden brown on top. Serve warm.

Topped with a little vanilla frozen yogurt or fresh whipped cream and this quick and tasty dessert will really hit the spot!

Fresh Strawberry Crisp I Pretty Little Pastimes

Fresh Strawberry Crisp

Roasted Balsamic Brussels Sprouts & Pearl Onions

Roasted Balsamic Brussel Sprouts & Pearl Onions I Pretty Little Pastimes

I’ll be honest that Brussels sprouts were on the list of green veggies that I tried my very best to stay away from growing up. My mom didn’t care for them, so I got out easy. That is until a good friend of mine (a James Beard nominated chef that doesn’t take no for an answer) decided I was not going one more day without trying one. She made me a plate and I reluctantly tried the tiny little cabbage-looking vegetable I feared. Like many foods she has proved me wrong about, the Brussels sprouts were more than just eatable, they were tasty! I wanted to share my version of Roasted Brussels Sprouts hoping that it might inspire a few more you to give them a try.

When shopping for Brussels sprouts, look for the smallest, freshest you can find. These tend to be sweeter and more tender than larger ones. Before cooking, trim the stems and discard any damaged or discolored leaves. Next, cut the sprouts in half (lengthwise); this will speed up the cooking time. Blasting the halved sprouts in a hot oven will caramelize the edges and bring out their sweetness. It also significantly shrinks them, so don’t be surprised when you pull them out of the oven!

I decided to add pearl onions to this dish, because I just love their subtly-sweet onion flavor, especially when paired with balsamic. To prepare the onions for roasting, soak them in warm water for 5 minutes. Remove the onions and discard the skin and trim the roots.

Roasted Balsamic Brussels Sprouts & Pearl Onions

  • 1 pound brussels sprouts, trimmed and halved
  • 1/2 pound pearl onions, trimmed
  • 2 ounces hot capicola (or pancetta), chopped
  • 2 cloves garlic cloves, minced
  • 3 tablespoons olive oil
  • 3 tablespoons balsamic vinegar
  • 1/2 teaspoon red pepper flakes (optional)
  • salt and pepper to taste

Preheat oven to 450 degrees. Toss all ingredients together and spread out in an even layer on a baking pan. I always line my pan with parchment paper for easy clean up, but if you don’t reserve a little warm water to deglaze the pan at the end. Roast the Brussels sprouts for 20-25 minutes or until the sprouts are brown on the edges and tender, stirring halfway through. Remove from the oven and serve warm.

Roasted Balsamic Brussel Sprouts & Pearl Onions I Pretty Little Pastimes

These roasted Brussels sprouts will make a wonderful sweet and spicy side dish to add to your dinner. I am definitely thankful that I was coaxed forced to try them. Enjoy!

Garlic & Leek Smashed Red Potatoes

Garlic & Leek Mashed Red Potatoes I Pretty Little Pastimes

If you like potato and leek soup, you will love these garlic and leek smashed red potatoes! We have a list of staple starch side dishes in our house which include potatoes, rice and orzo, but I have been experimenting more and more with new variations on old favorites.

We saw these fresh leeks while wandering around the produce section earlier this week and added them to our rapidly filling cart. If you haven’t cooked with leeks, keep in mind that they are in the same family as garlic and onions, but have a sweeter flavor. Unlike garlic and onions, there is no bulb on a leek and everything other than the root and stem base is edible, although most avoid the dark green section. Leeks are a good source of Vitamins A, B6, C and K, folic acid, calcium, magnesium, potassium, iron and fiber. They can be eaten raw, steamed, baked or sautéed, but avoid boiling as they will lose a majority of their nutrients.

Before working with leeks, rinse them well; dirt may be stuck between the tight leaves. Then trim the root and stem. I choose to only trim about an inch from the darkest green end of the leek, since most of the nutrients are found in the green section. Now they are ready!

Garlic & Leek Smashed Red Potatoes

  • 1 pound red potatoes
  • 4 strips pancetta (optional), chopped
  • 1 large leek
  • 3 garlic cloves (or to taste)
  • 1 and 1/2 tablespoons olive oil
  • 2 tablespoons butter
  • 1/4 cup milk (or soymilk)
  • salt & pepper to taste
  • chives to garnish

Garlic & Leek Smashed Red Potatoes I Pretty Little Pastimes

In a medium saucepan cover potatoes with water and generously season with salt. Bring to boil and let simmer for 15 minutes or until easily pierced with a fork.

While the potatoes are cooking slice the rinsed leeks into thin rings. Heat the olive oil in a medium skillet over medium heat. Add the leeks and garlic, season with salt and pepper and sauté until the leeks are softened, about 7 minutes, adding the pancetta halfway through.

Garlic & Leek Mashed Red Potatoes I Pretty Little Pastimes

Drain the potatoes and place them in a large bowl with half of the milk (1/8 cup) and the 2 tablespoons of butter. Using a potato masher, mash and add the additional milk by the tablespoon, until potatoes reach desired consistency. Fold in the leek mixture and season with salt and pepper. Top with freshly chopped chives and serve warm.

These potatoes are a great twist on a very simple recipe. The addition of the garlic and fresh leeks give these potatoes some new life. They make a great side for countless main dishes, plus they heat up well the next day … if you have any left over! Enjoy!

Follow my blog with Bloglovin

Dark Chocolate Chip Banana Cookies

Dark Chocolate Chip Banana Cookies I Pretty Little Pastimes

I have a terrible habit of buying bananas and letting them get too ripe sitting on the counter. I have tried the plastic wrap over the stem trick and I admit that it does prolong the inevitable over-browning of my poor produce. But this time, rather than giving up, I found a cookie recipe that calls for very ripe bananas. I tweaked it a little and added some dark chocolate chips and walnuts. They came out soft and cake-like and had a banana bread flavor, yum!

Dark Chocolate Chip Banana Cookies

  • 2 & 1/2 cups flour
  • 2 teaspoons baking powder
  • 1/2 teaspoon salt
  • 1/4 teaspoon baking soda
  • 1/2 cup sugar
  • 1/2 cup light brown sugar
  • 2/3 cup butter, softened
  • 2 eggs
  • 1 teaspoon pure vanilla extract
  • 1 cup mashed bananas (approx. 2 bananas)
  • 2 cups dark chocolate chips
  • 1 cup walnuts (optional)

Preheat your oven to 400 degrees. In a mixing bowl sift the flour, baking powder, salt and baking soda. In a separate mixing bowl, cream the butter with the white and brown sugars until light and fluffy. Beat in the eggs and pure vanilla extract. Mix the mashed bananas. Slowly add the flour mixture into the batter until just combined. Stir in the dark chocolate chips and walnuts. Drop the mixture by the tablespoonful onto a parchment lined cookie sheet. Bake for 7-10 minutes or until the bottoms are golden brown. Transfer the cookies to a wire rack and cool completely.

I loved the sweet banana smell that came wafting out of the kitchen while these were baking. They are a nice dessert alternative to banana bread and a great way to use up bananas that you might otherwise toss out. I would like to say that I will only be making these when I have a craving, but with my track record, they just might become a permanent staple around the house. Enjoy!

From Boston

Image

Thank you for all of the support and love coming from all over the world to the city of Boston. Yesterday was a tragic day in our history, and being so close to the bombings has certainly left a pit in my stomach. I took this photo the day before the race and planned on taking an action shot during the marathon, but (thankfully) forgot my camera and decided not to walk down to the finish line … many others were not so fortunate. The non stop sounds of sirens screaming past my office was a constant reminder that what I was seeing on the news was right outside my door. The city is very still today and the continuous presence of National Guard, SWAT, and Police units is just as unsettling as it is comforting.

Boston is a city of great history, a city which has remained steadfast at the face of turmoil; today is no different. I am so genuinely impressed by the strength and compassion of the individuals who have rallied to give aid and support. From families offering their home to displaced strangers, to the touching stories of fatigued marathon participants who continued running until they reached the hospital to donate blood, I am humbled and inspired. Perhaps my childhood friend Fred Rogers said it best, “When I was a boy and would see scary things in the news, my mother would say to me, ‘Look for the helpers. You will always find people who are helping.'”

My thoughts are with all of those near and far who were directly and indirectly affected by the bombings.

With love from Boston.

Lemon Blueberry Cookies

Lemon Blueberry Cookies I Pretty Little Pastimes

I have always been a big HUGE fan of lemon flavors in cooking and baking, so when I saw a recipe for lemon cookies, I knew what was next on my baking list! With the addition of lemon zest, fresh blueberries, and white chocolate chips these, these cookies really wowed me. With the use of the cake flour, they came out very soft and the flavor combination works for snacking from breakfast to dessert (dangerous)!

Lemon Blueberry Cookies

  • 1 cup unsalted butter, softened
  • 1 cup sugar
  • 2 eggs
  • 1/2 teaspoon salt
  • 1/2 teaspoon baking powder
  • 1/2 teaspoon baking soda
  • 3 & 1/4 cups cake flour
  • 2 teaspoons pure vanilla extract
  • 1/2 pint fresh blueberries
  • 1 cup white chocolate chips
  • zest of 1 lemon
  • juice of 1 lemon

In a large mixing bowl beat butter and sugar on medium speed until fluffy. Add the eggs, vanilla extract and lemon juice one at a time, mixing until incorporated after each. In a separate bowl, whisk together the flour, salt, baking powder and baking soda. Slowly add the dry ingredients into the wet and combine. With a rubber spatula, fold in the blueberries, lemon zest and white chocolate chips. Cover the bowl and place in the refrigerator for at least one hour.

Preheat your oven to 350 degrees. Spoon the cookie mixture onto a parchment lined cookie sheet and bake for 10-13 minutes or until the bottoms of the cookies are golden brown. Transfer the cookies to a wire rack and let cool completely.

The cookies do spread while in the oven, so try not to overcrowd (a couple of mine ran into each other). Also, if you are looking for a more traditional cookie texture, you can replace the cake flour with 3 cups all purpose flour.

These cookies did not last long in our house, so I know I will be making them again and again upon request! Enjoy!

Peanut Butter & Oatmeal Dog Treats

Image

This weekend I wanted to do something special for my pups, so I decided to make some homemade peanut butter and oatmeal dog treats! This recipe is great because most, if not all, of the ingredients I usually already have in the pantry. They are quick and easy to make and my dogs just love gobbling them up as soon as they are cool!

Peanut Butter & Oatmeal Dog Treats

  • 1/2 cup peanut butter
  • 1/4 cup honey
  • 1 tablespoon olive oil
  • 1 cup chicken broth
  • 1 cup rolled oats
  • 1 cup wheat flour
  • 1 cup unbleached flour
  • 1/4 teaspoon cinnamon

Preheat your oven to 350 degrees. In a mixing bowl, whisk together the peanut butter, honey, olive oil and chicken broth. In a separate bowl, combine the flours, oats and cinnamon. Slowly mix the dry ingredients into the peanut butter mixture until combined. If your dough is too dry add more chicken broth one tablespoon at a time.

Image

Transfer the dough to a flour dusted surface and roll the dough to about 3/8″ thick. Use a cookie cutter (I used a bone shaped one) and cut out your treats. Combine the scraps and keep rolling to get as many treats as you can out of the dough; I ended up with 26. Place the unbaked treats onto a parchment lined cookie sheet and bake for 13-15 minutes. Remove from the oven and transfer to a wire rack to cool completely.

I took a plate of these outside to get some shots when they were all baked, but a certain puppy of mine, Miss Maggie May, had other ideas!

dog treats 3 sm

By the look of this happy little face looking up at me, I’d say she liked them!

maggie may 3 sm